Hello World!
首先我們先將Qt Creator打開,並選擇+ New Project選擇 Qt Widgets Application > 輸入專案名稱以及專案位置 > 選擇ToolKit > 命名class(這是對我們這支程式主窗口的命名,我們使用預設的MainWindow) > 選擇版本控制(可留None)。
進來之後我們會看到檔案架構是這樣:
├─ Project
  ├─ Project.pro
  ├─ Headers
    ├─ mainwindow.h
  ├─ Sources
    ├─ main.cpp
    ├─ mainwindow.cpp
  ├─ Forms
    ├─ mainwindow.ui
先來解釋一下這些檔案的用處:.pro檔 : 利用qmake進行程式建置時,qmake所讀取的檔案便是.pro,與我們平常在建置C++檔案時make所讀取的makefile 概念是相像的。
Headers資料夾 : 存放header(標頭檔)所存放的位置。
Sources資料夾 : 存放Source Code的位置。
Forms資料夾 : 存放圖形化介面設計檔.ui的位置。
Resource資料夾 : 不一定會存在,只有當你利用qrc載入檔案時才會出現。詳細會在後面詳述。
好啦~那我們接下來要來看一下預設的Qt Widgets Application給我們了什麼預設程式碼:
In .pro File
QT       += core gui

greaterThan(QT_MAJOR_VERSION, 4): QT += widgets

TARGET = Project
TEMPLATE = app


SOURCES += main.cpp\
           mainwindow.cpp

HEADERS  += mainwindow.h

FORMS    += mainwindow.ui
.pro檔用於紀錄qmake所會用到的資訊,因為在我們的專案中會使用大許多的宣告、函式庫,.pro可以利用簡易的檔案結構去取代複雜的專案建構文件。這個內容以及細節會在後面的文章中介紹。
In main.cpp
#include "mainwindow.h"
#include <QApplication>

int main(int argc, char *argv[])
{
    QApplication a(argc, argv);
    MainWindow w;
    w.show();

    return a.exec();
}
main.cpp是我們專案運行不可或缺的檔案,其中含有int main()函式,在一般的專案建立時都會預設就存在了。
In mainwindow.h file
#ifndef MAINWINDOW_H
#define MAINWINDOW_H

#include <QMainWindow>

namespace Ui {
class MainWindow;
}

class MainWindow : public QMainWindow
{
    Q_OBJECT

public:
    explicit MainWindow(QWidget *parent = 0);
    ~MainWindow();

private:
    Ui::MainWindow *ui;
};

#endif // MAINWINDOW_H
MainWindow物件的標頭檔。MainWindow物件是整個專案中最主要的那個視窗。可以在創立子專案的階段對這個物件做命名的動作。
In mainwindow.cpp file
#include "mainwindow.h"
#include "ui_mainwindow.h"

MainWindow::MainWindow(QWidget *parent) :
    QMainWindow(parent),
    ui(new Ui::MainWindow)
{
    ui->setupUi(this);
}

MainWindow::~MainWindow()
{
    delete ui;
}
MainWindow物件的Source File,物件中的函式主體宣告在此文件中。
In mainwindow.ui file
<?xml version="1.0" encoding="UTF-8"?>
<ui version="4.0">
 <class>MainWindow</class>
 <widget class="QMainWindow" name="MainWindow">
  <property name="geometry">
   <rect>
    <x>0</x>
    <y>0</y>
    <width>400</width>
    <height>300</height>
   </rect>
  </property>
  <property name="windowTitle">
   <string>MainWindow</string>
  </property>
  <widget class="QWidget" name="centralWidget"/>
  <widget class="QMenuBar" name="menuBar">
   <property name="geometry">
    <rect>
     <x>0</x>
     <y>0</y>
     <width>400</width>
     <height>21</height>
    </rect>
   </property>
  </widget>
  <widget class="QToolBar" name="mainToolBar">
   <attribute name="toolBarArea">
    <enum>TopToolBarArea</enum>
   </attribute>
   <attribute name="toolBarBreak">
    <bool>false</bool>
   </attribute>
  </widget>
  <widget class="QStatusBar" name="statusBar"/>
 </widget>
 <layoutdefault spacing="6" margin="11"/>
 <resources/>
 <connections/>
</ui>
mainwindow.ui是用來定義MainWindow物件的外觀,使用Qt Creator開發Qt Widgets Application時,外觀設定只能由Source Code中插入元件,或由Design Mode更改,無法直接編輯.ui檔。
主要是這幾個檔案,因為這章是介紹而已,所以我們不會對內部程式碼有太深的介紹,那接著我們要來加入一些東西,完成我們的第一任務 : 在視窗中顯示出"Hello World!",至於詳細的程式碼內容在本書的後面章節皆會一一詳述喔。 那我們現在要開始Demo Hello World的部分了,我們直接拿MainWindow的建構函式來開刀囉~
In mainwindow.cpp file
#include <QLabel>
#include <QVBoxLayout>

//省略不重要的部分,沒寫到的部分就是跟原本一樣喔

MainWindow::MainWindow(QWidget *parent) :
    QMainWindow(parent),
    ui(new Ui::MainWindow)
{
    ui->setupUi(this);
    QLabel *label = new QLabel("Hello World!"); // 建立一個QLabel物件用來顯示純文字
    QVBoxLayout *layout = new QVBoxLayout; //建立一個QLayout物件,用來放置GUI元件
    layout->addWidget(label); //將QLabel物件放入QLayout中

    ui->centralWidget->setLayout(layout); //將我們創建了QLayout放入centralWidget中。
}
請注意一件事:在範例中的centralWidget有可能實際上名稱與我的不同,請進入Qt Design Mode查看QMainWindow底下最主要的QWiget名稱為何。
這樣就將Hello World顯示在我們的視窗中了,圖中範例是window的視窗。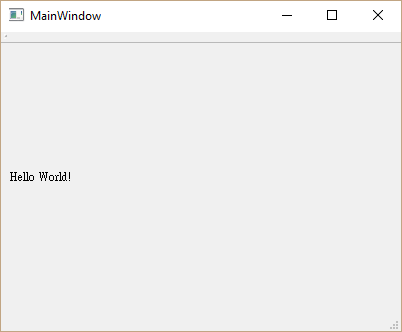
那我們的Hello World教學就到這裡。